
Understanding Neuroplasticity

Neuroplasticity, often referred to as brain plasticity, is the remarkable ability of the brain to reorganize itself by forming new neural connections throughout life. This adaptability allows the brain to adjust its activities in response to new situations, experiences, and injuries. Neuroplasticity is key to learning, memory, recovery, and habits.

The Neuroplasticity of Habit Formation

  1. “Neurons that fire together, wire together” (Donald Hebb): Repeated behaviors strengthen neural pathways. The habits you make were made through consistency not intensity.
  2. Mindfulness and Learning: Mindfulness and mental rehearsal can physically change the brain’s structure in response to learning or environmental changes. New neurons can be generated, especially in the hippocampus, which plays a crucial role in memory.

Factors Influencing Neuroplasticity

Photo by Tatiana Syrikova on Pexels.com

Several factors can influence neuroplasticity:

  • Age: Younger brains tend to exhibit more plasticity, but adults and seniors can still benefit from activities that challenge their brains.
  • Environment: Engaging in stimulating environments—be it through education, social interactions, or new experiences—can enhance neuroplasticity.
  • Health: Physical health, mental well-being, and nutrition play crucial roles in maintaining and enhancing neuroplasticity.
Photo by Radik 2707 on Pexels.com

Applications of Neuroplasticity

Understanding neuroplasticity has significant implications in various fields:

  • Rehabilitation: Neuroplasticity principles are applied in stroke and injury rehabilitation, where therapies encourage the brain to re-establish lost functions.
  • Education: Educational strategies can be developed to leverage neuroplasticity, enhancing learning and memory retention.
  • Mental Health: Understanding how the brain can rewire itself aids in developing therapies for mental health issues, such as depression and anxiety.

Conclusion

Neuroplasticity highlights the brain’s astonishing capacity to adapt and change throughout life. By embracing activities that promote neuroplasticity, individuals can enhance their cognitive abilities, recover from injuries, and improve overall mental health. As research in this area continues to evolve, our understanding of the brain’s adaptability promises exciting possibilities for education, therapy, and personal growth.

Uneven Shoulders and Neck Pain?

Is it the Pectoralis Minor Causing your Shoulder Asymmetry?

The human shoulder complex is a marvel of anatomical engineering, enabling a wide range of movements. However, muscle imbalances can lead to postural issues and asymmetries, one of which can be attributed to the pectoralis minor muscle.

What is the Pectoralis Minor?

The pectoralis minor is a small, triangular muscle located beneath the larger pectoralis major in the chest. It originates from the third through fifth ribs and inserts into the coracoid process of the scapula (shoulder blade). Key functions of the pectoralis minor include downward rotation or stabilizing the scapula and assisting in movements such as arm elevation.

Mechanisms Leading to Uneven Shoulders

Photo by MART PRODUCTION on Pexels.com

While the pectoralis minor plays a role in shoulder mechanics, its dysfunction can lead to uneven shoulder presentation. Here are several ways how this can occur:

1. Muscle Tightness

If the pectoralis minor becomes tight due to factors like poor posture (such as hunching or prolonged sitting), it may exert uneven tension on the scapula. This can cause one shoulder to elevate higher than the other.

2. Weakness or Imbalance

Weakness in the pectoralis minor can also lead to uneven shoulders. If one side of the muscle is weaker than its counterpart, it may fail to perform its stabilizing role effectively. This imbalance leads to compensatory movement patterns, where other muscles (trapezius) overwork to maintain shoulder elevation, exacerbating asymmetry.

3. Postural Implications

Long-term poor posture can reinforce imbalances in the pectoralis minor and other shoulder muscles. Slouching or rounding the shoulders forwards can lead to contraction and shortening of the pectoralis minor, causing it to pull the scapula out of its intended position. This creates a cascading effect – not only impacting the pec minor but affecting the entire shoulder girdle and leading to pronounced unevenness in shoulder appearance.

Addressing Uneven Shoulders Due to Pectoralis Minor Dysfunction

1. Massage and Stretching

Photo by Ketut Subiyanto on Pexels.com

Incorporating targeted massage and stretch for the pectoralis minor can help alleviate tightness and improve shoulder and neck alignment:

  • Hot Water Bag: Place a filled hot water bag on the shoulder and chest area of the elevated shoulder for 20 minutes to an hour; the longer the better. Wrap a towel around the bag to prevent burning of the skin.
  • Massage Gun: Place a massage gun at the coracoid process and massage down/up to the third, then fourth, and fifth rib.
  • Stretch: Stand at the edge of a wall and place your bent elbow (approximately 90 degrees) a little higher than shoulder height on the wall. Then step the same side leg forward into a lunge and feel a stretch in your pec minor.

2. Strengthening Exercises

Additionally, strengthening the pectoralis minor, rhomboids and middle trapezius can create balance:

  • Chest Flys: Using light dumbbells or resistance bands, perform chest flys to engage the pectoralis minor while promoting balanced activation, because weak muscles do not stretch.
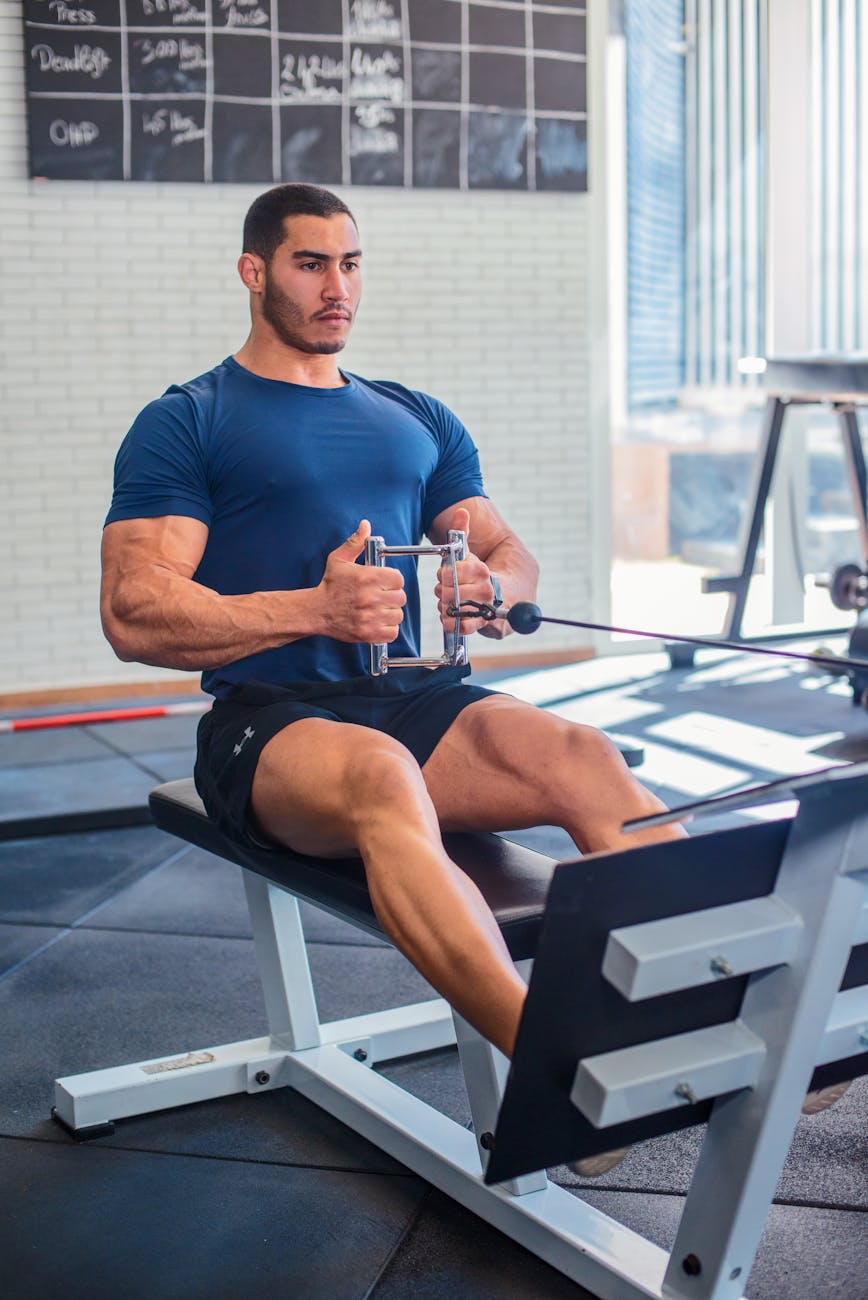
  • Scapular Retraction: Utilizing exercises like seated rows can help strengthen the muscles that support proper scapular positioning and counterbalance the pectoralis minor. These muscles would be the rhomboids and the middle trapezius.
Photo by moha sour on Pexels.com

3. Postural Awareness

Being mindful of posture during daily activities is vital. Practicing good ergonomics and incorporating regular movement breaks can prevent tightness in the pectoralis minor and limit compensatory behaviors that lead to uneven shoulders.

Photo by Kara Muse on Pexels.com

Conclusion

The pectoralis minor, while a small muscle, holds significant influence over shoulder symmetry and function. Dysfunction in this muscle can lead to uneven shoulders due to tightness, weakness, or poor scapular control. By understanding these dynamics and implementing stretching, strengthening, and posture correction strategies, individuals can work towards a more balanced and functional shoulder presentation, ultimately enhancing their overall musculoskeletal health.

Superman to Forearm Plank

The Superman pose to Forearm Plank is a great way to strengthen your core, back, and shoulders. Follow these steps to execute the movement effectively:

Step 1: Start with the Superman Pose

  1. Lie Down: Begin by lying face down on your exercise mat or a flat surface. Extend your arms straight in front of you and keep your legs straight behind you.
  2. Lift Your Limbs: Inhale and simultaneously raise your arms, chest, and legs off the ground as high as comfortable. Hold this position for a few seconds, focusing on lengthening your body and engaging your back muscles.
Photo by Pavel Danilyuk on Pexels.com

Step 2: Prepare for the Transition

  1. Get Ready to Lower: As you exhale, slowly lower your arms and legs back towards the ground and transition into the next position.

Step 3: Move into Forearm Plank

  1. Bend Your Elbows: Bring your forearms down to the ground, keeping your elbows directly under your shoulders.
  2. Position Your Hands: Place your palms flat on the mat for added support.
  3. Lift Your Body: Tuck your toes under and push through your elbows as you lift your hips off the ground. Your body should form a straight line from head to heels. Make sure to engage your core and avoid sagging or arching your back.

Step 4: The Forearm Plank

  1. Maintain Alignment: Ensure your head is in a neutral position, gazing slightly ahead rather than straining your neck.
  2. Pelvic Tilt: Tilt your pelvis posteriorly and hold this position for a few seconds.
Photo by MART PRODUCTION on Pexels.com

Step 5: Release the Position

Lower Your Body: To come out of the Forearm Plank, gently lower yourself to the ground, inhale and repeat the superman pose.

Tips for Success

  • Warm-Up: Always warm up before any workout to prevent injury.
  • Focus on Form: Keep your body in a straight line during the plank to maximize effectiveness and reduce the risk of back pain.
  • Practice Regularly: The more you practice this transition, the smoother it will become.

Incorporate this movement into your core training routine to enhance your strength and stability. Do 3 sets of 10 reps each to start. Happy training!

Understanding Prediabetes: A Key to Preventing Type 2 Diabetes

What is Prediabetes?

Prediabetes is a health condition characterized by higher-than-normal blood sugar levels, but not yet high enough to be classified as Type 2 diabetes. According to the Centers for Disease Control and Prevention (CDC), approximately 88 million American adults—or 1 in 3—have prediabetes. This condition serves as a critical warning sign and provides an opportunity for individuals to make lifestyle changes to prevent the progression to Type 2 diabetes.

The Importance of Recognizing Prediabetes

Photo by Alena Darmel on Pexels.com

Identifying prediabetes is crucial for several reasons:

  1. Early Intervention: Recognizing prediabetes allows for early intervention, which can significantly reduce the risk of developing Type 2 diabetes. Lifestyle modifications made at this stage can lead to substantial health benefits.
  2. Reversibility: Prediabetes is often reversible. Many individuals can lower their blood sugar levels back to a normal range through effective lifestyle changes such as diet and exercise.
  3. Reducing Health Risks: By managing prediabetes, individuals can reduce their risk of associated health complications, including heart disease, stroke, and certain cancers.

How Prediabetics Can Prevent Diabetes

1. Lifestyle Modifications

The transition from prediabetes to diabetes is not inevitable. The primary method of preventing diabetes is through lifestyle modifications:

  • Healthy Eating: Adopting a balanced diet that is rich in whole foods, such as fruits, vegetables, whole grains, and lean proteins, can help regulate blood sugar levels. Reducing the intake of processed foods, sugary snacks, and beverages is also crucial.
  • Regular Physical Activity: Engaging in regular physical activity aids in weight management and improves insulin sensitivity. The CDC recommends at least 150 minutes of moderate-intensity exercise each week.
  • Weight Management: Even a modest weight loss of 5-7% of total body weight can improve blood sugar levels and lower the risk of developing Type 2 diabetes.

2. Monitoring Blood Sugar Levels

Regular monitoring of blood sugar levels helps individuals understand their progress and make necessary adjustments to their lifestyle. Keeping track of blood sugar readings can motivate individuals to adhere to their health goals.

3. Education and Support

Accessing educational resources and support groups can provide individuals with valuable information and encouragement. These resources may include:

  • Diabetes Prevention Programs: Many communities offer programs that focus on lifestyle change and skill-building to help individuals manage their health.
  • Health Coaching: Working with a health coach or nutritionist can enhance motivation and provide personalized strategies for managing prediabetes.
Photo by Yaroslav Shuraev on Pexels.com

Conclusion

Prediabetes represents a critical stage in the continuum of diabetes management. Recognizing and addressing this condition is essential for preventing the onset of Type 2 diabetes. Through lifestyle changes, monitoring, and support, individuals can take proactive steps toward better health and significantly reduce their risk of developing diabetes and its associated complications. Recognizing the importance of prediabetes as a warning sign can empower individuals to make informed decisions about their health.

Photo by RDNE Stock project on Pexels.com

Clicking During Elbow Extension?

Understanding Tight Elbow Flexors

The elbow joint is a complex structure that facilitates a wide range of motion, enabling activities from lifting weights to playing musical instruments. However, some individuals experience a clicking sound during elbow extension, which can be attributed to tight elbow flexor muscles. This article explores the anatomy involved, the effects of tight flexors, and potential solutions to alleviate the issue.

Anatomy of the Elbow Joint

The elbow is made up of bones, ligaments, tendons, and muscles. The primary bones include the humerus, radius, and ulna, which work together to allow flexion and extension. The main elbow flexors are the three B’s:

  • Biceps Brachii: Located at the front of the upper arm, responsible for flexing the elbow and supinating the forearm.
  • Brachialis: Lies underneath the biceps and also flexes the elbow.
  • Brachioradialis: Runs along the forearm and helps in elbow flexion, especially in a neutral position.
Photo by Alexa Popovich on Pexels.com

Impact of Tight Elbow Flexors

Tightness in the elbow flexors can develop due to various factors, including repetitive motions, lack of stretching, or prolonged static positions. This tightness can lead to several problems:

  1. Limited Range of Motion: Tight flexors restrict the ability to fully extend the elbow, causing compensatory movements during activities.
  2. Joint Laxity: When tight muscles exert pressure on tendons and ligaments, it may lead to instability around the joint, resulting in abnormal movements.

The Clicking Phenomenon

The clicking sound heard during elbow extension could be due to:

  • Tendon Snapping: As the muscles and tendons slide over bony structures during movement, they may produce a snapping sound if there is tightness or restriction.
  • Joint Dysfunction: Tight flexors may alter normal joint mechanics, leading to the misalignment of the joint surfaces and creating noises as they move against each other.

Solutions for Tight Elbow Flexors

Massage Gun to Forearm Flexors Photo by Liam Moore on Pexels.com

To alleviate tightness in the elbow flexors and reduce clicking during extension, consider the following strategies:

  1. Massage Gun: Use a massage gun to massage the fascia of the radial tuberosity down the length of the radius and the bicipital aponeurosis. Be gentle because this area is an endangerment site, and you don’t want to injure a nerve or artery. This can help relieve tension and improve muscle elasticity.
  2. Stretching Exercises: Incorporate regular stretching to improve flexibility in the biceps, brachialis, and brachioradialis. This can enhance range of motion and decrease tension.
    • Biceps Stretch: Stand with your arm outstretched, palm facing down, and gently pull back on the fingers to stretch the biceps.
    • Forearm Stretch: Extend one arm in front, palm facing up, and use the opposite hand to gently pull down on the fingers.
  3. Consult a Professional: If clicking persists or is accompanied by pain, consult a physical therapist or healthcare provider for personalized assessment and treatment!
Bicep Stretch Photo by Kampus Production on Pexels.com
Forearm Stretch Photo by Kampus Production on Pexels.com
Chest/Bicep/Forearm Stretch Photo by RDNE Stock project on Pexels.com

Conclusion

Tight elbow flexors can cause clicking during elbow extension due to limitations in movement and alterations in joint mechanics. By focusing on stretching and proper care, individuals can manage this condition and restore optimal function to their elbow joints, reducing discomfort and improving activity performance.

Photo by Kampus Production on Pexels.com

Reverse Lunge to A-Skip

The Reverse Lunge to A-Skip is a dynamic movement that combines strength and agility. This exercise not only enhances lower body strength but also improves coordination, balance, and overall athletic performance. In this article, we will explore the benefits, proper technique, and variations of this exercise.

Benefits of Reverse Lunge to A-Skip

  1. Strength Development: The reverse lunge primarily targets the quadriceps, hamstrings, glutes, and calves. Incorporating the A-skip further engages the hip flexors and core, ensuring a full lower body workout.
  2. Improved Coordination: Transitioning from a reverse lunge into an A-skip requires coordination between the upper and lower body, helping to enhance motor skills and agility.
  3. Injury Prevention: Strengthening the lower body through lunging movements can improve stability and reduce the risk of injuries, particularly in the knees and hips.
  4. Enhanced Athletic Performance: This movement mimics the patterns used in running and sports, making it beneficial for athletes looking to improve their performance.

Proper Technique

Step 1: Reverse Lunge

  1. Starting Position: Stand tall with your feet hip-width apart.
  2. Lunge: Step back with your right leg, lowering your body until your left thigh is parallel to the ground. Keep your front knee inline with your big toe and your chest lifted.
  3. Return: Push through your left heel to return to the starting position, bringing your right foot forward.

Step 2: A-Skip

  1. Starting Position: From the upright position after the lunge, initiate the A-skip.
  2. Knee Drive: Drive your right knee towards your chest, keeping your left leg straight.
  3. Skip Movement: As you bring your knee up, push off with your left foot, propelling yourself upward and forward. Alternate the movement, skipping as you switch legs.

Transitioning Between Movements

  • Flow: After completing a reverse lunge on one leg, immediately drive your knee up into the A-skip without pausing. The transition should be smooth and continuous.

Tips for Success

  • Warm-Up: Always warm up before attempting this exercise to prepare your muscles and reduce the risk of injury.
  • Maintain Form: Focus on your form during both the lunge and skip. Quality over quantity is essential to prevent strain!
  • Increase Intensity Gradually: Start slow and as you become more comfortable with the movement, increase the speed and height of your skips.

Variations

  1. Weighted Reverse Lunge: Hold dumbbells in each hand to increase resistance during the reverse lunge phase.
  2. Lateral A-Skip: Perform the A-skip laterally instead of forward to work different planes of motion.
  3. Single-Leg Balance: Add a balance challenge by holding the A-skip position for a moment before transitioning back to the lunge.

Conclusion

Incorporating the Reverse Lunge to A-Skip into your fitness routine can significantly enhance your strength, coordination, and athletic performance. Whether you are an athlete or a fitness enthusiast, mastering this dynamic movement will aid in developing a strong and effective lower body.

Access to Health Issues?

Key Considerations

Introduction

Addressing access to health issues is crucial to the success of coaching relationships. This article outlines the primary considerations regarding access to health issues for health coach clients.

1. Understanding Client Background

Health and wellness coaches must take into account the diverse backgrounds of their clients. Factors such as socioeconomic status, education level, and cultural backgrounds can affect access to healthcare resources and influence the client’s ability to engage in wellness activities.

2. Geographic Location

Geographic location significantly impacts access to wellness resources. Coaches should assess whether clients live in urban or rural areas, as this can determine the availability of local health facilities, fitness centers, and wellness programs. Rural clients may have limited options, necessitating creative coaching strategies and resource-sharing.

Photo by Dawid Zawiu0142a on Pexels.com

3. Technology Access

With the rise of telehealth and online wellness programs, it is vital to consider clients’ access to technology. Coaches should identify if their clients have reliable internet access and the necessary devices to participate in virtual sessions. This is particularly important for those who may not be tech-savvy or have limited resources.

Photo by Polina Zimmerman on Pexels.com

4. Language and Communication Barriers

Effective communication is key to coaching success. Coaches should consider language barriers that may hinder the coaching process. Utilizing translation services or providing materials in multiple languages can help ensure that all clients have equal access to coaching services.

Photo by Ron Lach on Pexels.com

5. Physical and Neurodivergent Health Considerations

Clients may face physical or neurodivergent health challenges that affect their ability to participate in wellness activities. Coaches should be aware of these issues and tailor their approaches accordingly. Understanding clients’ physical limitations and neurodivergent health statuses can help create a more inclusive coaching environment.

Photo by cottonbro studio on Pexels.com

6. Financial Considerations

Cost can be a significant barrier for many clients seeking health and wellness coaching. Coaches should discuss payment options and potential financial assistance programs that may be available. Transparency regarding pricing and exploring sliding scale fees can help make services more accessible.

Photo by RDNE Stock project on Pexels.com

7. Inclusivity and Sensitivity

Coaches must foster an inclusive space that welcomes clients of all backgrounds and experiences. This involves being sensitive to the unique challenges faced by clients and actively working to create a supportive environment. Training in cultural competence can enhance a coach’s ability to connect with diverse clients.

Photo by Yan Krukau on Pexels.com

Conclusion

Addressing access issues is critical for health coach clients’ success in their health and wellness journeys. By considering factors such as client background, geographic location, technology access, language barriers, health status, financial constraints, and inclusivity, health and wellness coaches can better support their clients in achieving their goals. Prioritizing these considerations not only enhances the coaching relationship but also contributes to overall client satisfaction and success.

Photo by RDNE Stock project on Pexels.com

Understanding Pelvic Tilts

Pelvic tilts are a fundamental movement that can enhance body mechanics and contribute to overall musculoskeletal health. In this article, we will explore what pelvic tilts are, their benefits, instructions on how to perform them, and how they can fit into a broader fitness regimen.

What Are Pelvic Tilts?

Pelvic tilts are exercises that involve tilting the pelvis forward and backward. This movement helps improve the flexibility and strength of the lower back, abdominal muscles, and hips. Pelvic tilts can be particularly beneficial for individuals experiencing lower back pain or those who spend long hours sitting.

Benefits of Pelvic Tilts

  1. Improves Posture: Regular practice of pelvic tilts can help realign the spine and pelvis, leading to better posture.
  2. Strengthens Core Muscles: This exercise engages the core, strengthening the abdominal muscles and stabilizing the spine.
  3. Relieves Back Pain: Pelvic tilts can decrease tension in the lower back, providing relief and stability.
  4. Enhances Flexibility: The movement promotes better flexibility in the hip flexors and lower back.
  5. Aids in Pregnancy: For pregnant individuals, pelvic tilts can help alleviate back discomfort and prepare the body for labor.

How to Perform Pelvic Tilts

Here’s a simple step-by-step guide to performing pelvic tilts:

Starting Position

  1. Lie on your back on a flat surface (such as a mat or carpet).
  2. Bend your knees and place your feet flat on the ground, hip-width apart.
  3. Keep your arms relaxed at your sides or place your hands on your abdomen.

Movement

  1. Inhale: Take a deep breath, allowing your abdomen to rise gently.
  2. Tilt: As you exhale, gently flatten your lower back against the floor by tilting your pelvis upward. Imagine tucking your tailbone under.
  3. Hold: Maintain this position for a few seconds while continuing to breathe steadily.
  4. Release: Inhale again to return to the starting position.
  5. Repeat: Perform this movement 10-15 times, focusing on smooth and controlled motions.

Pelvic Tilts in Your Workout

Pelvic tilts can be easily integrated. Here are a few tips:

  • Warm-Up: Include pelvic tilts as part of your warm-up before engaging in other exercises.
  • Cool Down: After a workout, use pelvic tilts to stretch and relax your lower back.
  • Daily Practice: For those with sedentary lifestyles, practicing pelvic tilts daily can counteract the effects of prolonged sitting.
Deadbug Exercise Photo by Loren Castillo on Pexels.com

Conclusion

Pelvic tilts are a simple yet effective exercise that can significantly contribute to back health, posture, and overall core strength. By incorporating them into your fitness routine, you can enjoy the myriad benefits they offer while enhancing your physical well-being.

NBHWC: Types of Bias in Coaching

The National Board for Health and Wellness Coaching (NBHWC) recognizes that bias can significantly impact coaching practices and client relationships. Awareness of these biases is essential for effective coaching. Below, I explore various types of bias highlighted by the NBHWC and their implications in health and wellness coaching.

1. Cognitive Bias

Cognitive bias refers to systematic patterns of deviation from norm or rationality in judgment, leading individuals to make illogical inferences or decisions. In coaching, this can manifest as:

  • Confirmation Bias: Focusing on information that confirms pre-existing beliefs while disregarding conflicting data.
  • Anchoring Bias: The tendency to rely too heavily on the first piece of information encountered (the “anchor”) when making decisions.

Implications

Coaches must be aware of cognitive biases to foster an objective and supportive environment, ensuring they do not unconsciously guide clients towards predetermined outcomes.

2. Cultural Bias

Photo by Bilge u015eeyma Ku00fctu00fckou011flu on Pexels.com

Cultural bias refers to interpreting and judging phenomena by standards inherent to one’s own culture. In a coaching context, this can lead to misunderstanding or miscommunication with clients from diverse backgrounds.

Implications

It’s essential for coaches to practice cultural humility and be open to learning about their clients’ cultural contexts to offer more personalized and effective coaching.

3. Affirmative Bias

Affirmative bias occurs when a coach may favor or favorably perceive clients based on specific characteristics, such as gender, ethnicity, or socio-economic status, potentially impacting the coaching process.

Implications

Coaches should strive to maintain an equitable approach, ensuring that all clients receive unbiased attention and support regardless of their background.

Photo by Magda Ehlers on Pexels.com

4. Attribution Bias

Attribution bias involves the tendency to attribute behaviors and outcomes to individual characteristics rather than situational factors. This type of bias may lead coaches to misunderstand a client’s motivations or challenges.

Implications

Understanding the distinction between internal and external factors influencing clients’ actions is crucial for coaches to avoid making incorrect assumptions about their clients.

5. Implicit Bias

Implicit bias refers to unconscious attitudes or stereotypes that affect understanding, actions, and decisions. Coaches may unknowingly hold biases that can influence their interactions with clients.

Implications

Coaches are encouraged to engage in self-reflection and training to identify and mitigate implicit biases, enhancing their ability to reason and respond to clients fairly and equitably.

Conclusion

Bias in coaching can create barriers to achieving effective client outcomes. By recognizing and addressing the various types of bias outlined by the NBHWC, a coach can foster a more inclusive and supportive environment, ultimately leading to better health and wellness outcomes for their clients. Continuous education and self-awareness are key components in overcoming bias and promoting equity in coaching practices.

Photo by JACK REDGATE on Pexels.com

Understanding the Pes Anserinus Tendon

The pes anserinus, commonly known as the “goose’s foot,” is a notable anatomical structure located on the medial side of the proximal tibia. This tendon plays a significant role in knee stability and function, as it is the convergence of three distinct muscles. This article will explore the anatomy and function of the pes anserinus tendon.

Anatomy of the Pes Anserinus

Location

The pes anserinus is situated on the medial aspect of the tibia, just below the knee joint. Its name is derived from the Latin term for “goose’s foot,” reflecting the appearance created by the converging tendons.

Composition

The pes anserinus is formed by the tendons of three muscles:

  1. Sartorius: Originates from the anterior superior iliac spine (ASIS) and is mainly responsible for hip flexion and abduction.
  2. Gracilis: A long, slender muscle that originates from the pubis and functions to adduct the thigh and flex the knee.
  3. Semitendinosus: Part of the hamstring group, this muscle originates from the ischial tuberosity and assists in knee flexion and hip extension.
Photo by Byrle 3gp on Pexels.com

Insertion

  • All three tendons converge to insert at the anteromedial aspect of the tibia at a common site.

Functions of the Pes Anserinus

The pes anserinus tendon serves several important roles in lower limb function:

  1. Knee Stability: It provides support to the knee joint, helping to stabilize the area during movement and load-bearing activities.
  2. Knee Flexion: The muscles contributing to the pes anserinus are involved in flexing the knee, making it essential for various activities such as walking, running, and climbing.
  3. Medial Support: The pes anserinus helps stabilize the medial aspect of the knee, which is particularly important during activities that involve lateral movements.
  4. Hip Function: While its primary role is at the knee, the sartorius and gracilis also contribute to movements at the hip, including flexion and adduction.

Conclusion

The pes anserinus tendon is a crucial structure that plays a significant role in the stability and functionality of the knee. By understanding its anatomy and functions, individuals can appreciate its importance in everyday movements and athletic activities.

Photo by RDNE Stock project on Pexels.com